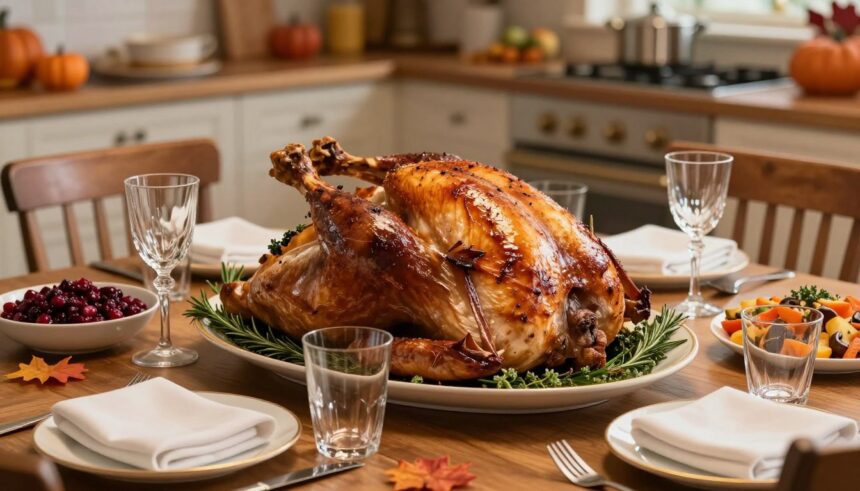
Thanksgiving dinner is all about the turkey, and getting it just right is crucial. A perfectly roasted bird is the centerpiece of the meal, with its juicy meat and crispy, salty skin.
- The Perfect Thanksgiving Turkey: What Makes It Special
- Essential Ingredients for Your Turkey Recipe
- Preparation: Getting Your Turkey Ready
- Creating the Perfect Herb Butter Mixture
- Step-by-Step Turkey Recipe Instructions
- Roasting Your Thanksgiving Turkey
- Expert Tips for a Juicy, Flavorful Turkey
- Carving and Serving Your Masterpiece
- Conclusion: Your Path to Turkey Success
- FAQ
- What is the best way to thaw a frozen turkey?
- How do I know if my turkey is cooked to a safe internal temperature?
- What is the purpose of trussing a turkey?
- How often should I baste the turkey while it’s roasting?
- Can I stuff the turkey with aromatics and herbs?
- How long should I let the turkey rest after roasting?
- What is the foil tent technique, and how does it help?
- How do I make a delicious gravy to accompany my roasted turkey?
This well-loved recipe produces a turkey that’s both flavorful and visually appealing. The simplicity of this method makes it accessible to cooks of all levels, and it’s a great way to achieve a deliciously roasted turkey without the need for brining.
By following this turkey recipe, you’ll learn key techniques like herb butter application and proper roasting to ensure a mouth-watering result. Plus, expert tips will help you avoid common mistakes and achieve a perfectly cooked turkey with a rich gravy to accompany it.
Key Takeaways
- Simple and effective recipe for a deliciously roasted turkey
- No brining required, making it a convenient option
- Expert tips for avoiding common mistakes and achieving a perfectly cooked bird
- Adaptable for different turkey sizes and occasions
- Key techniques covered, including herb butter application and proper roasting
The Perfect Thanksgiving Turkey: What Makes It Special
Thanksgiving is a time-honored tradition in the United States, and at the heart of this celebration is the majestic turkey. This centerpiece of the holiday meal is more than just a dish; it’s a symbol of family, friends, and the harvest season.

Why Turkey is the Star of Thanksgiving
The cultural significance of turkey on Thanksgiving is deeply rooted in American history and tradition. The tradition of serving turkey on Thanksgiving dates back to the early days of the United States, and over time, it has evolved into a beloved holiday staple.
Turkey has become an integral part of Thanksgiving celebrations due to its rich flavor, tender texture, and the role it plays in bringing families and friends together.
Key Elements of a Memorable Turkey
A truly memorable Thanksgiving turkey is characterized by its juicy meat, flavorful skin, and proper cooking. The balance between moist meat and crispy skin is the hallmark of a perfectly cooked turkey.
Aromatics inside the turkey create depth of flavor without traditional stuffing, while the right balance of herbs and butter lays the foundation for a deliciously flavored bird.
Presentation matters almost as much as taste, making the turkey a true centerpiece of the holiday meal.
Essential Ingredients for Your Turkey Recipe
The foundation of a great Thanksgiving turkey is built on the quality of its ingredients. To achieve a deliciously moist and flavorful turkey, you’ll need to select the right size and type, prepare a savory herb butter, and choose the appropriate aromatics for the cavity.
Selecting the Right Turkey
When it comes to choosing a turkey, size matters. A good rule of thumb is to plan for about 1 to 1.5 pounds of turkey per person. For an 8-12 person gathering, an 11-15 pound pound turkey is ideal. Fresh turkey is preferable when possible due to its better texture and flavor, though frozen can be a good alternative if thawed properly.
Herb Butter
The herb butter is a crucial component that adds flavor to your turkey. To make it, you’ll need butter, specifically unsalted to control the salt level, mixed with olive oil, lemon juice and zest, garlic, parsley, salt, and pepper.
Aromatics for the Cavity
Stuffing the cavity of your turkey with aromatics like onion, garlic, parsley, and a quartered lemon enhances the flavor. These ingredients infuse the turkey with a savory and slightly citrusy taste, making it more appealing. It’s also important to note that traditional bread stuffing should be cooked separately for food safety.
Preparation: Getting Your Turkey Ready
Getting your turkey ready for the oven involves a few critical steps that are often overlooked. Proper preparation is key to a delicious and safe Thanksgiving meal.
Thawing Your Turkey Safely
Thawing your turkey is the first step in preparation. According to the USDA guidelines, you should thaw your frozen turkey in the refrigerator for 1 day for every 4 to 5 lbs of turkey. For example, a 12 lb turkey will take approximately 3 days to thaw. It’s crucial to never cook a frozen or partially frozen turkey, as it will cook unevenly.
- Thaw in the fridge for 1 day per 4-5 pounds
- Avoid thawing at room temperature
- Plan ahead for large turkeys
For those short on time, alternative quick-thaw methods include thawing in cold water, changing the water every 30 minutes. However, it’s essential to prioritize food safety during this process.
Removing Giblets and Pat Drying
Once your turkey is thawed, remove the neck and bag of giblets from both cavities. Pat the turkey dry with paper towels, inside and out, to remove excess moisture. This step is crucial for achieving crispy, golden skin.

Bringing to Room Temperature
Before cooking, remove the turkey from the fridge about 30 minutes in advance to bring it to room temperature. This helps ensure even roasting. Proper positioning in the roasting pan also matters, as it allows for air to circulate around the turkey.
| Step | Description | Importance |
|---|---|---|
| Thawing | Thaw in fridge or cold water | Ensures even cooking |
| Giblet Removal | Remove neck and giblets | Prevents contamination |
| Pat Drying | Use paper towels to dry | Achieves crispy skin |
By following these steps, you’ll be well on your way to a perfectly cooked, delicious Thanksgiving turkey.
Creating the Perfect Herb Butter Mixture
A perfectly blended herb butter is the key to a succulent and flavorful turkey. The herb butter mixture is a crucial component that enhances the overall taste and aroma of your Thanksgiving turkey.
Mixing Herbs and Butter
To create the herb butter, combine 2 sticks of softened butter, 2 Tbsp olive oil, 1/2 Tbsp lemon zest, 4 Tbsp lemon juice, and 3 pressed garlic cloves, 1/4 cup chopped parsley, 1/2 Tbsp salt, and 1/2 tsp pepper in a medium bowl. It’s essential to soften the butter without melting it, as this will ensure a smooth and even mixture. You can achieve this by leaving the butter at room temperature for about 30 minutes before mixing.
The mixture should be well combined, with the herbs and garlic evenly distributed throughout the butter. This will not only add flavor to the turkey but also create a beautiful, aromatic presentation.
Applying Butter Under and Over the Skin
To apply the herb butter, gently separate the skin from the turkey breast by pushing your fingers under the skin, being careful not to tear it. Then, stuff 2/3 of the butter mixture under the skin, spreading it evenly around the breast and thighs by massaging over the top of the skin. This helps to keep the meat moist and flavorful.
Finally, apply the remaining 1/3 of the herb butter over the outside of the turkey, making sure to cover the entire surface. This will create a crispy, golden-brown skin that’s sure to impress your guests.
| Ingredient | Quantity |
|---|---|
| Softened Butter | 2 sticks |
| Olive Oil | 2 Tbsp |
| Lemon Zest | 1/2 Tbsp |
| Lemon Juice | 4 Tbsp |
| Garlic Cloves | 3 |
| Chopped Parsley | 1/4 cup |
| Salt | 1/2 Tbsp |
| Pepper | 1/2 tsp |
Step-by-Step Turkey Recipe Instructions
To achieve a perfectly cooked Thanksgiving turkey, follow these detailed steps.
The key to a delicious turkey lies in its preparation and cooking technique.
Stuffing the Cavity with Aromatics
Begin by preparing the turkey cavity for roasting.
To infuse your turkey with rich flavors, stuff the cavity with a quartered onion, 4 halved garlic cloves, 1/2 bunch of parsley, and a quartered lemon.
This aromatic mixture will enhance the overall taste of your turkey.
The combination of onion, garlic, and herbs will create a savory and inviting aroma.
Make sure to gently place these ingredients inside the cavity to avoid damaging the turkey.
Positioning in the Roasting Pan
Proper positioning of the turkey in the roasting pan is crucial for even cooking.
Place the turkey in the roasting pan, breast side up, to ensure that the breast cooks evenly and remains moist.
Using a roasting rack can elevate the turkey, allowing air to circulate underneath and promoting crispy skin.
If you don’t have a roasting rack, you can improvise by placing vegetables like carrots and celery at the bottom of the pan to create a bed for the turkey.
This technique not only aids in even cooking but also adds extra flavor to your dish.
To Truss or Not to Truss
Trussing the turkey is a matter of personal preference and can affect the presentation and cooking of the bird.
To truss your turkey, use kitchen string to tie the legs together, tucking the wings under the body.
This technique can help the turkey cook more evenly and prevent the wings and legs from burning.
However, some chefs argue that trussing can prevent the turkey from cooking evenly, as it can restrict air circulation around the body.
Ultimately, whether to truss or not depends on your desired outcome and cooking style.
| Technique | Benefits | Considerations |
|---|---|---|
| Trussing | Even cooking, visually appealing | May restrict air circulation |
| Not Trussing | Better air circulation, easier to cook | May result in uneven cooking |
By following these steps and considering your options for trussing, you’ll be well on your way to creating a delicious and memorable Thanksgiving turkey.
Roasting Your Thanksgiving Turkey
## Roasting Your Thanksgiving Turkey
To achieve a perfectly roasted Thanksgiving turkey, it’s essential to follow a precise temperature and timing plan. Pre-heat your oven to 430˚F on the bake mode.
### Temperature Settings and Timing
Start by roasting your turkey uncovered at 430˚F for 20 minutes. Then, reduce the oven temperature to 350˚F and continue baking. For a 12-pound turkey, bake for an additional 2 hours and 30 minutes. The general rule of thumb is to bake for approximately 13 minutes per pound at 350˚F.
### Using a Meat Thermometer Correctly
To ensure your turkey is cooked to a safe internal temperature, use a meat thermometer. Insert the thermometer into the thickest part of the thigh, avoiding any bones or fat. The internal temperature should reach 165˚F.
### The Foil Tent Technique
To prevent overcooking the breast while allowing the dark meat to finish cooking, use the foil tent technique. Fold a large square sheet of foil into a triangle and rub one side with olive oil. Place the foil, oil-side down, over the turkey breast. Remove the foil for the last 30 minutes of cooking to allow the breast to brown.
By following these steps and guidelines, you’ll be able to achieve a deliciously roasted Thanksgiving turkey that’s sure to impress your guests.
Expert Tips for a Juicy, Flavorful Turkey
Elevate your Thanksgiving feast with a perfectly cooked turkey by following these expert tips. A deliciously roasted turkey is the centerpiece of any Thanksgiving celebration.
Why You Don’t Need to Brine
This recipe eliminates the need for brining, saving you time while still producing juicy results. The combination of the herb butter and the resting process ensures that the turkey remains moist and flavorful.
The Importance of Resting Your Turkey
Letting the turkey rest is crucial. After removing it from the oven, transfer it to a serving platter and cover it loosely with foil. Let it rest for at least 1 hour. This allows the juices to redistribute, making the turkey more tender and easier to carve.
Common Mistakes to Avoid
To ensure your turkey is cooked to perfection, avoid common mistakes such as opening the oven too frequently or overcooking. Use a meat thermometer to check that the breast reaches 165˚F and the thigh reaches 170-180˚F. Make sure to not overcrowd the roasting pan, as this can affect the even cooking of the turkey. When the turkey is done, it should be removed from the oven and let to let turkey rest.
Carving and Serving Your Masterpiece
A beautifully carved turkey is the centerpiece of any successful Thanksgiving dinner. It’s not just about the taste; the presentation plays a crucial role in the overall dining experience. In this section, we’ll guide you through the steps to carve your turkey like a pro and present it in a way that will impress your guests.
Step-by-Step Carving Guide
Carving a turkey requires some skill and the right technique. Start by removing the legs and thighs, then slice the breast meat against the grain. Make sure to use a sharp knife and carve on a stable surface. For the legs, separate the drumsticks from the thighs and slice the meat accordingly.
To get the most meat from your turkey, carve in a direction parallel to the bone. This technique not only maximizes the yield but also makes the presentation more appealing.
Presentation Ideas for Your Thanksgiving Table
The presentation of your turkey can elevate the entire Thanksgiving experience. Consider decorating around your turkey with seasonal elements like kale, small apples, sliced oranges, and quartered lemons to create a festive atmosphere.
To make the most of your roasting pan drippings, use them to make a delicious gravy to accompany your meal. Simply deglaze the pan with a bit of broth or wine, then whisk in some flour to thicken. The result is a rich and flavorful turkey gravy that complements the meal perfectly.
By following these steps and tips, you’ll be able to carve and serve your turkey with confidence, making your Thanksgiving dinner a memorable one.
Conclusion: Your Path to Turkey Success
The key to a memorable Thanksgiving dinner lies in the preparation and cooking of the turkey. By following our step-by-step guide, you can achieve a deliciously cooked turkey that will be the centerpiece of your holiday meal. To recap, you can fully prepare your turkey a day ahead – stuff, butter it up, cover, and refrigerate overnight. Then, simply remove it from the refrigerator one hour before baking the next day.
Some key takeaways include using the right turkey size, creating an herb butter mixture, and not overcooking. You can also make ahead and freeze leftover turkey for up to 3 months. By following these steps, you’ll be sure to impress your guests and create a lasting impression. With these tips, you’re ready to make this recipe a new tradition for years to come.
Wishing you a wonderful and stress-free Thanksgiving meal with your loved ones!
FAQ
What is the best way to thaw a frozen turkey?
To thaw a frozen turkey safely, allow about 24 hours of thawing time for every 4-5 pounds in the refrigerator. You can also thaw it in cold water, changing the water every 30 minutes.
How do I know if my turkey is cooked to a safe internal temperature?
Use a meat thermometer to check the internal temperature of the turkey. It should reach 165°F (74°C) in the thickest part of the breast and 180°F (82°C) in the innermost part of the thigh.
What is the purpose of trussing a turkey?
Trussing a turkey helps it cook more evenly by binding the legs together, promoting consistent heat distribution and preventing the wings from burning.
How often should I baste the turkey while it’s roasting?
Baste the turkey every 30 minutes to keep it moist and promote even browning. You can use melted butter or pan drippings for basting.
Can I stuff the turkey with aromatics and herbs?
Yes, you can stuff the turkey cavity with aromatics like onion, carrot, and celery, as well as fresh herbs. This will add flavor to the turkey as it roasts.
How long should I let the turkey rest after roasting?
Let the turkey rest for at least 20-30 minutes after roasting. This allows the juices to redistribute, making the turkey more tender and juicy.
What is the foil tent technique, and how does it help?
The foil tent technique involves covering the turkey with foil during roasting to prevent overbrowning. Remove the foil for the last 30 minutes to allow the skin to crisp up.
How do I make a delicious gravy to accompany my roasted turkey?
To make a delicious gravy, deglaze the roasting pan with a little liquid, then whisk in flour to make a roux. Gradually add more liquid, whisking continuously, until you achieve the desired consistency.