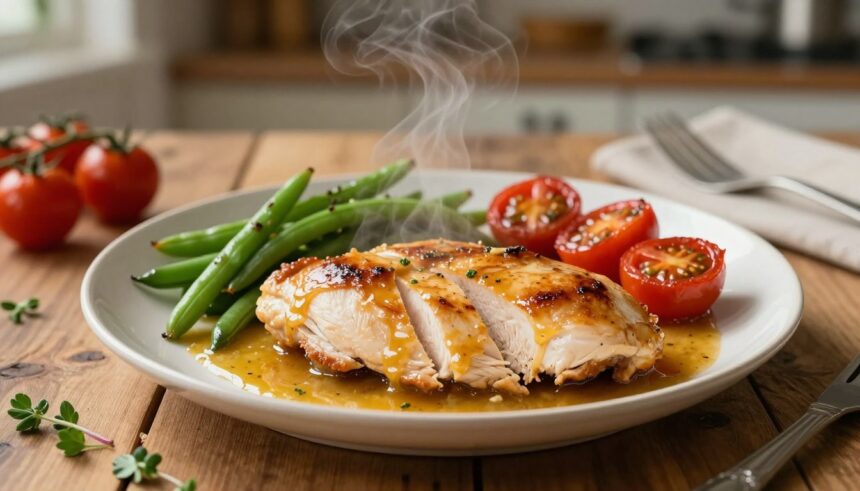
Discover the secret to a juicy and flavorful chicken breast dish that’s ready in just minutes. This melt-in-your-mouth chicken breast recipe transforms ordinary chicken into an extraordinary main course.
- Why This Chicken Breast Recipe Stands Out
- Ingredients You’ll Need
- Kitchen Equipment Required
- Preparing Your Chicken Breasts
- The Magic Seasoning Blend
- Step-by-Step Cooking Instructions
- Making the Optional Butter Sauce
- How to Tell When Your Chicken is Perfectly Cooked
- The Critical Resting Period
- Serving Suggestions
- Variations to Try
- Storing and Reheating Leftovers
- Make-Ahead and Meal Prep Tips
- Nutritional Information
- Common Mistakes to Avoid
- Conclusion
- FAQ
- How long can I store cooked chicken in the fridge?
- Can I use chicken thighs instead of breasts in this recipe?
- What is the ideal internal temperature for cooked chicken?
- Can I prepare the seasoning blend ahead of time?
- How do I prevent overcooking the chicken?
- Can I use this recipe for meal prep?
- What are some good side dishes to serve with this chicken?
The special seasoning blend and cooking technique used in this recipe make it stand out from other chicken recipes. It solves the common problem of dry, flavorless chicken breasts, requiring only minimal ingredients that most people already have in their pantry.
This recipe is perfect for busy weeknights when you need a quick, delicious protein option. Its simplicity and consistently excellent results have made it a reader favorite.
Key Takeaways
- A special seasoning blend for enhanced flavor.
- A unique cooking technique for juicy results.
- Optional butter sauce for added richness.
- Minimal ingredients required.
- Quick and easy preparation.
- Perfect for busy weeknights.
Why This Chicken Breast Recipe Stands Out
In the realm of chicken recipes, this one deserves special attention for its simplicity and flavor. The beauty of this chicken breast recipe lies in its ability to deliver a mouth-watering dinner in under 30 minutes, making it perfect for busy weeknights when time is of the essence.
The Secret to Juicy Chicken Breasts
The secret to achieving juicy chicken breasts every time is in the preparation and cooking method. This recipe ensures that the chicken is cooked to perfection, retaining its moisture and flavor. The simple ingredient list means less prep time and fewer items to purchase, making it a practical choice for any dinner plan.

Quick and Easy Weeknight Dinner Solution
This chicken breast recipe is designed to be a quick and easy solution for weeknight dinner. It serves as a great foundation for multiple meal variations throughout the week. The cooking method is straightforward and doesn’t require special equipment or techniques, making it accessible to everyone. Moreover, this recipe can be scaled up easily for meal prep or feeding a larger family, and it can be prepared ahead of time and cooked when needed for even faster dinner service.
When paired with simple sides, this recipe fits neatly into a balanced meal plan, providing a nutritious and satisfying dinner option. With its numerous benefits and versatility, it’s no wonder this chicken recipe stands out among other recipes.
Ingredients You’ll Need
Let’s dive into the ingredients required for this mouth-watering chicken breast dish. The quality of the ingredients plays a crucial role in the final flavor and texture of the chicken.
For the Chicken and Seasoning
The chicken breasts are the star of the dish, and the seasoning blend is what gives them their incredible flavor. You’ll need chicken breasts, brown sugar, smoked paprika, garlic powder, salt, and pepper. The combination of these ingredients creates a sweet, savory, and slightly smoky flavor profile that complements the chicken perfectly.
For the Optional Butter Sauce
If you want to elevate your chicken breast to the next level, consider making the optional butter sauce. This rich and creamy sauce is made with butter, pan drippings, and a touch of wine or chicken stock for deglazing.
The ingredients needed specifically for the optional butter sauce include:
- 4 tablespoons of unsalted butter
- 2 tablespoons of all-purpose flour
- 1/2 cup of dry white wine (such as Chardonnay or Sauvignon Blanc)
- 1/2 cup of chicken stock
- Fresh herbs like parsley or thyme for garnish
- A squeeze of fresh lemon juice
The butter sauce adds a luxurious and creamy element to the dish, coating the chicken in a rich and flavorful glaze. Deglazing the pan with wine or chicken stock incorporates the caramelized bits and flavors from the chicken seasoning, enhancing the overall taste of the sauce.

When it comes to deglazing, you have options: you can use wine for a deeper flavor, chicken stock for added richness, or even water as a simpler alternative. If you choose to use wine, a dry white wine works best, as it adds a crisp acidity that cuts through the richness of the butter.
To finish the sauce, you can add a sprinkle of fresh herbs or a squeeze of lemon juice. These finishing touches brighten the flavors and add a fresh note to the dish. The consistency of the sauce can be adjusted by simmering it for a longer or shorter period, depending on your preference.
As
“The art of cooking is not just about following a recipe, it’s about understanding the harmony of flavors and textures.”
This quote encapsulates the essence of creating a dish like our Melt In Your Mouth Chicken Breast Recipe, where the balance of flavors in thesauceand the chicken is key to its success.
Kitchen Equipment Required
Having the appropriate kitchen tools on hand is vital for successfully cooking chicken breast. To achieve a delicious and tender dish, you’ll need a few essential pieces of equipment.
First and foremost, a good quality pan or baking dish is necessary for even cooking. If you plan to use the stovetop method, a heavy-bottomed skillet is ideal, while a sheet pan is perfect for oven baking. A meat thermometer is also crucial for ensuring that your chicken is cooked to a safe internal temperature.
- A meat mallet or rolling pin for pounding the chicken breast to an even thickness.
- A cutting board for preparing the chicken.
- A sharp knife for trimming excess fat.
- A pan or baking dish for cooking the chicken breast.
- An oven-safe thermometer to ensure accurate temperature.

Optional equipment includes a garlic press for mincing garlic and a zester for adding fresh citrus zest. While not essential, these tools can make preparation easier and enhance the flavor of your dish.
Proper equipment contributes significantly to the success of your cook chicken recipe. By using the right tools, you’ll be able to achieve a perfectly cooked chicken breast that’s sure to impress.
Preparing Your Chicken Breasts
Properly preparing your chicken breasts is the first step towards a delicious meal. This process involves more than just seasoning; it requires careful handling to ensure even cooking and optimal texture.
Trimming and Pounding Technique
To begin, you’ll need to trim any excess fat from your chicken breasts. This not only improves the appearance but also prevents flare-ups during cooking. Next, you’ll need to pound the breasts to achieve an even thickness.
Using a meat mallet, gently pound the thicker parts of the breast until they match the thinner areas. This technique is crucial for ensuring that your chicken breast cooks uniformly.
The Importance of Even Thickness
Achieving even thickness in your chicken breasts is vital for several reasons. Firstly, it ensures that the entire piece cooks in the same amount of time. When breasts are uneven, the thinner parts tend to overcook while the thicker parts remain undercooked.
- Even thickness ensures consistent cooking time throughout the entire piece.
- Proper thickness affects the absorption of seasonings and enhances caramelization.
- It contributes to the “melt in your mouth” texture promised in this chicken breast recipe.
By taking the time to properly prepare your chicken, you’ll significantly improve the final result. Though this step is simple, it’s often overlooked, making a significant difference in the quality of your dish.
The Magic Seasoning Blend
To achieve that perfect flavor, our chicken breast recipe relies on a special seasoning blend that combines a variety of spices to create a mouth-watering taste experience.
The Role of Brown Sugar
Brown sugar is a crucial ingredient in our magic seasoning blend. It adds a depth of flavor and a hint of sweetness that complements the savory taste of the chicken. The sugar also helps in browning the chicken, creating a crispy exterior that contrasts beautifully with the juicy interior.
A Perfectly Balanced Spice Mix
The magic seasoning blend is more than just a single ingredient; it’s a carefully crafted mix of various spices that work together in harmony. Let’s break down the key components:
- Paprika adds a mild smoky flavor and a vibrant color, enhancing the visual appeal of the dish.
- Garlic and onion powders provide aromatic depth without the risk of burning that can occur with fresh garlic and onions.
- Herbs like oregano or thyme add complexity and a fresh, earthy flavor.
- The right amount of salt and pepper is crucial for enhancing all other flavors and bringing the dish together.
Adjusting the spice levels is also straightforward. For those who prefer a bit more heat, adding a pinch of cayenne pepper or red pepper flakes can elevate the dish. Conversely, reducing or omitting such ingredients can make the recipe more suitable for those who prefer milder flavors.
| Spice | Contribution |
|---|---|
| Paprika | Mild smoky flavor and color |
| Garlic Powder | Aromatic depth |
| Onion Powder | Aromatic depth |
| Oregano/Thyme | Complexity and fresh flavor |
| Salt & Pepper | Enhances all other flavors |
As
“The art of cooking is the art of adjustment.”
, adjusting the seasoning blend to your taste is an essential part of cooking. Our magic seasoning blend is designed to be a versatile starting point that you can adjust according to your preferences.
By combining these elements, the magic seasoning blend creates a balanced flavor profile that complements the chicken perfectly, making it a standout dish in any meal.
Step-by-Step Cooking Instructions
The key to a delicious oven-baked chicken breast lies in the details of the cooking process. To ensure that your chicken is cooked to perfection, follow these steps carefully.
Preheating and Preparation
Preheating your oven to the correct temperature is crucial. Set your oven to 375°F (190°C). While the oven is heating up, prepare your chicken breasts by patting them dry with a paper towel. This step helps the seasoning adhere to the chicken more effectively.
Applying the Seasoning
Evenly sprinkle the prepared seasoning blend over both sides of the chicken breasts. Make sure to coat them thoroughly for the best flavor. The seasoning blend, which includes brown sugar and perfectly balanced spices, will enhance the natural taste of the chicken.
Baking Time and Temperature
Place the seasoned chicken breasts on a baking sheet lined with parchment paper or aluminum foil, leaving some space between them for even cooking. Put the baking sheet in the oven and bake at 375°F (190°C). The baking time will depend on the thickness of the chicken breasts.
For chicken breasts that are about 1 inch thick, bake for 20-25 minutes. For thicker breasts (around 1.5 inches), you may need to bake for 30-35 minutes. It’s essential to check the chicken’s internal temperature to ensure it reaches 165°F (74°C) for safe consumption.
| Chicken Breast Thickness | Baking Time |
|---|---|
| 1 inch | 20-25 minutes |
| 1.5 inches | 30-35 minutes |
It’s also important not to open the oven door too often, as this can affect the cooking time and result in unevenly cooked chicken. Use a meat thermometer to verify the doneness. Visual cues include the chicken being white and firm to the touch.
Oven variations can impact cooking time, so keep an eye on your chicken breasts. If they’re cooking too quickly, you might need to reduce the oven temperature or cover the chicken with foil to prevent overcooking. Conversely, if they’re cooking too slowly, ensure that your oven is at the correct temperature.
By following these step-by-step cooking instructions and being mindful of the factors that can affect cooking time, you’ll be able to achieve perfectly cooked, juicy chicken breasts every time.
Making the Optional Butter Sauce
The optional butter sauce is a game-changer for this chicken breast recipe, adding a depth of flavor that’s sure to impress. This sauce is not only a great accompaniment to the chicken but also enhances the overall dining experience.
Deglazing the Pan
To start making the butter sauce, begin by deglazing the pan used for cooking the chicken. Deglazing involves adding a liquid to the hot pan to loosen the browned bits, known as fond, which are rich in flavor. You can use wine, broth, or even water for deglazing. Simply pour the chosen liquid into the pan, scraping the bottom with a wooden spoon to release the fond.
Finishing the Sauce
After deglazing, reduce the liquid by half to concentrate the flavor. Then, it’s time to incorporate the butter into the sauce. Adding cold butter in small pieces while continuously whisking the sauce will give it a rich and creamy texture. This technique is known as “mounting” the sauce with butter. The cold butter melts slowly, thickening the sauce and giving it a glossy finish.
For added flavor, consider incorporating herbs like parsley or thyme, a squeeze of lemon juice, or a splash of cream into the sauce. These optional additions can enhance the overall taste and make the sauce even more delicious.
Achieving the perfect consistency for the sauce is crucial. If the sauce becomes too thick, you can thin it out with a little more liquid. Conversely, if it’s too thin, continue to reduce it until it reaches the desired consistency. To keep the sauce warm without breaking, place it over low heat and whisk occasionally. If the sauce breaks, don’t worry; you can often rescue it by whisking in a little more butter or cream.
When it’s time to serve, spoon the butter sauce over the chicken breast. This not only adds visual appeal but also ensures that each bite is infused with the rich, savory flavor of the sauce. Proper serving techniques, such as drizzling the sauce just before serving, can make a significant difference in the overall presentation and enjoyment of the dish.
How to Tell When Your Chicken is Perfectly Cooked
Determining when your chicken is perfectly cooked can be a challenge, but there are several reliable methods. Ensuring that your chicken breast is cooked to a safe internal temperature is crucial for food safety and quality.
One of the most accurate ways to check if your chicken is cooked is by using a meat thermometer. The internal temperature of the meat should reach 165°F (74°C). This is the safest way to ensure that your chicken is fully cooked and safe to eat.
Apart from using a thermometer, there are other visual cues and texture changes that can indicate doneness. When chicken is perfectly cooked, the juices should run clear, and the meat should feel firm to the touch. Overcooked chicken breast tends to be dry and tough.
Common mistakes in judging doneness include relying solely on cooking time or the color of the meat. However, factors like the size and thickness of the breast can affect cooking time, making it unreliable. It’s also important to consider carryover cooking, where the meat continues to cook a bit after being removed from the heat.
| Method | Description | Reliability |
|---|---|---|
| Meat Thermometer | Checks internal temperature | High |
| Visual Cues | Juices run clear, no pink color | Medium |
| Texture | Feels firm to the touch | Medium |
| Cooking Time | Based on minutes cooked | Low |
To achieve perfectly cooked chicken, it’s essential to combine these methods. For instance, using a thermometer in conjunction with checking the texture and juices can provide a more accurate assessment of doneness. By understanding these indicators and avoiding common pitfalls, you can consistently cook chicken to perfection.
The Critical Resting Period
The moment your chicken breast comes out of the oven, it’s time to let it rest, not serve. “Resting is just as important as cooking when it comes to achieving a juicy and tender breast,” says culinary experts. This often-overlooked step is crucial for redistributing the juices throughout the meat, ensuring that every bite is as flavorful as possible.
When you cook chicken, the proteins contract and push the juices towards the surface. If you cut into it immediately, those juices spill out, leaving you with a drier texture. By letting it rest, you allow the proteins to relax, and the juices to redistribute, making the chicken breast retain its juicy texture.
The optimal resting time can vary based on the size of your chicken breasts. Generally, a resting period of 5 to 10 minutes is recommended. For larger breasts, you might need to wait a bit longer, while smaller ones might be ready sooner.
To maintain the temperature during the resting period, it’s advisable to tent your chicken breast with foil. This simple step helps keep the meat warm without trapping too much moisture, which could make the skin soggy.
Skipping the resting period can lead to a less enjoyable dining experience. Without this crucial step, your chicken might end up drier and less flavorful. Timing the resting period with the completion of your side dishes can help streamline your meal preparation, ensuring everything is ready at the same time.
So, how do you know when the resting period is complete? A good rule of thumb is to check the temperature and the firmness of the meat. Once it feels firm but still yields to pressure, it’s ready to be served.
Serving Suggestions
Elevate your dining experience with thoughtful serving suggestions for your chicken breast. The way you present your Melt In Your Mouth Chicken Breast can significantly enhance the overall appeal of the dish. Whether you’re serving it for a weeknight dinner or a special occasion, the right accompaniments and presentation can make all the difference.
Side Dish Pairings
Choosing the right side dishes to accompany your chicken breast can complement its flavors and textures. Consider pairing it with roasted vegetables, such as asparagus or Brussels sprouts, for a well-rounded meal. A fresh salad or a serving of quinoa can also provide a nice contrast to the rich flavors of the chicken.
| Side Dish | Description |
|---|---|
| Roasted Asparagus | A simple and flavorful option that pairs well with the chicken. |
| Quinoa Salad | A nutritious and filling side that complements the chicken breast. |
| Garlic Mashed Potatoes | A comforting side dish that pairs well with the savory flavors of the chicken. |
Garnishing for Presentation
Garnishing your chicken breast can add a touch of elegance and freshness to the dish. Fresh herbs like parsley or thyme can add color and aroma, while a squeeze of lemon can provide brightness and visual appeal.
- Fresh herbs like parsley or thyme for added color and freshness
- Lemon wedges or zest for a burst of citrus flavor
- Drizzling the optional butter sauce for a rich and creamy finish
- Edible flowers or microgreens for a touch of elegance on special occasions
When it comes to plating, consider showcasing the chicken breast as the star of the meal. You can arrange the side dishes around it in a visually appealing manner. For family-style serving, place the chicken in the center of the table with the side dishes arranged around it.
By paying attention to the details of serving and presentation, you can elevate your chicken breast recipe from a simple meal to a memorable dining experience.
Variations to Try
Adapting the Melt In Your Mouth Chicken Breast Recipe to suit your taste preferences is easy with a few simple variations. One of the most significant adaptations you can make is switching from chicken breasts to thighs.
Herb and Spice Substitutions
Before diving into using chicken thighs, let’s explore how you can modify the seasoning blend to suit your taste. The Magic Seasoning Blend is a key component of this recipe, but you can easily substitute different herbs and spices to create a unique flavor profile. For instance, you can add Italian seasoning for a Mediterranean twist or smoked paprika for a smoky flavor.
Using Chicken Thighs Instead
Using chicken thighs instead of breasts can significantly alter the dish. Thighs are generally more forgiving and often result in juicier meat due to their higher fat content. When using thighs, you can opt for either boneless, skinless thighs or bone-in, skin-on thighs, depending on your preference.
Cooking time and temperature will differ when using chicken thighs. Thighs typically require a slightly longer cooking time due to their density. It’s recommended to cook them at the same temperature (400°F or 200°C) but for an additional 10-15 minutes, or until they reach an internal temperature of 165°F (74°C).
The flavor and texture differences between using breasts and thighs are notable. Thighs have a richer, more intense chicken flavor and a tender, moist texture when cooked correctly. To adjust the seasoning for thighs, you may want to increase the amount slightly due to their larger size and higher fat content.
- To tell when chicken thighs are properly cooked, check for an internal temperature of 165°F (74°C).
- The juices should run clear when pierced with a fork.
- For bone-in thighs, ensure the meat near the bone is cooked through.
By making these adjustments and understanding the differences between chicken breasts and thighs, you can confidently adapt the Melt In Your Mouth Chicken Breast Recipe to your liking.
Storing and Reheating Leftovers
Properly storing leftover chicken breast is crucial for maintaining its quality and safety. After cooking, let the chicken rest for a few minutes before storing it in the refrigerator.
To store leftover chicken effectively, use airtight containers or wrap it tightly with plastic wrap or aluminum foil. This prevents moisture from escaping and keeps other flavors from the fridge from affecting the chicken.
Cooked chicken breast can be safely stored in the fridge for 3-4 days. If you don’t plan to consume it within this timeframe, consider freezing it. Frozen cooked chicken can last for up to 3-4 months.
When reheating, it’s essential to heat the chicken to an internal temperature of 165°F (74°C) to ensure food safety. You can reheat it in the oven, microwave, or on the stovetop. To prevent drying out, reheat it with a bit of moisture, such as chicken broth or sauce.
| Reheating Method | Instructions | Tips |
|---|---|---|
| Oven | Preheat to 350°F (175°C). Place chicken in a baking dish, cover with foil. | Add a splash of chicken broth to keep moist. |
| Microwave | Place chicken in a microwave-safe dish, cover with a microwave-safe lid. | Heat in short intervals, checking temperature until it reaches 165°F (74°C). |
| Stovetop | Place chicken in a pan with a bit of oil or broth, heat over medium heat. | Stir occasionally until heated through. |
To determine if stored chicken is still safe to eat, check for any visible signs of spoilage, such as off smells, slimy texture, or mold growth. Always err on the side of caution when it comes to food safety.
By following these guidelines, you can enjoy your leftover chicken breast while maintaining its quality and ensuring it’s safe to eat.
Make-Ahead and Meal Prep Tips
Meal prep just got tastier with our simple and versatile chicken breast recipe, perfect for busy weeks. This recipe is designed to be flexible, allowing you to prepare components ahead of time and assemble meals as needed.
To incorporate this chicken recipe into your weekly meal prep routine, start by preparing the chicken breasts according to the instructions. You can season and bake the chicken in advance, storing it in the fridge for up to 3 days.
Here are some tips for making the most of your meal prep with this recipe:
- Prepare the chicken breasts up to a day in advance. Store them in an airtight container in the fridge.
- Scale the recipe to suit your meal needs for the week. This recipe can easily be doubled or tripled.
- Repurpose the cooked chicken into different meals, such as salads, wraps, or pasta dishes, to keep your meals interesting throughout the week.
- Package individual portions in containers for grab-and-go convenience, making it easy to stick to your meal plan.
For a sample meal prep plan, consider dedicating a few hours on the weekend to prep your meals for the next few days. Cook the chicken, prepare your choice of sides (such as roasted vegetables or quinoa), and portion them out into individual containers. This way, you’ll have healthy, home-cooked meals ready to go for the next few days, saving you time during the busy week.
By incorporating this chicken breast recipe into your meal prep routine, you’ll not only save time but also ensure that you’re eating healthy, delicious meals. The flexibility of this recipe makes it an ideal choice for anyone looking to streamline their meal prep process.
Nutritional Information
Let’s dive into the nutritional information of this mouth-watering chicken breast dish to understand its value in a balanced diet. The chicken breast is renowned for being a lean protein source, making it an excellent choice for those looking to reduce their fat intake while maintaining high protein consumption.
Per serving, this recipe provides a substantial amount of protein, which is essential for muscle repair and growth. The exact nutritional content can vary based on the size of the chicken breast and whether the optional butter sauce is included. Generally, a serving of chicken breast without the sauce contains approximately 140 calories, with a macronutrient breakdown of 3g fat, 0g carbohydrates, and 26g protein.
The chicken breast is not only a great source of protein but also provides essential vitamins and minerals such as niacin, vitamin B6, and phosphorus. These nutrients play crucial roles in energy metabolism and maintaining healthy cells.
Including the optional butter sauce will increase the calorie count due to the added butter and potentially heavy cream or milk. This addition can significantly alter the nutritional profile, increasing the fat content. For those watching their calorie or fat intake, it’s advisable to adjust the amount of sauce used or consider alternatives with lower fat content.
For individuals with specific dietary needs, this recipe can be adapted. For example, reducing the amount of salt used can make it more suitable for those on a low-sodium diet. Similarly, using less butter or substituting it with a lower-fat alternative can cater to low-fat dietary requirements.
Understanding the nutritional content of our chicken breast recipe allows you to make informed decisions about your diet. Whether you’re tracking your macros or simply looking for a healthy meal option, this dish can be a valuable addition to your meal plan.
Common Mistakes to Avoid
To ensure your baked chicken breast turns out juicy and flavorful, it’s crucial to steer clear of certain pitfalls. Two of the most significant errors home cooks make involve overcooking and improper seasoning.
Overcooking Issues
Overcooking is a common mistake that can result in dry, tough chicken. To avoid this, it’s essential to monitor the cooking temperature and time closely. Using a meat thermometer can help ensure that your chicken is cooked to a safe internal temperature of 165°F (74°C) without overcooking it.
Tips for avoiding overcooking:
- Use a meat thermometer to check internal temperature.
- Don’t overbake; adjust cooking time based on the size and thickness of the chicken breasts.
- Let the chicken rest after baking to allow juices to redistribute.
Seasoning Pitfalls
Proper seasoning is vital for flavor. One common mistake is under-seasoning or unevenly applying seasoning and salt. To achieve well-balanced flavors, make sure to season the chicken thoroughly on all sides.
Another issue is the timing of seasoning. Seasoning too early or too late can affect the final flavor. Ideally, season the chicken just before baking, or let it sit for about 30 minutes to allow the seasonings to penetrate the meat.
Best practices for seasoning:
- Season the chicken evenly on all sides.
- Avoid seasoning too early or too late; aim for just before baking.
- Consider letting the seasoned chicken sit for a short period to enhance flavor absorption.
By avoiding these common mistakes, you can significantly improve the quality of your chicken dishes. Proper seasoning and careful cooking will result in a deliciously flavorful baked chicken breast every time.
Conclusion
The melt-in-your-mouth chicken breast recipe is a testament to the power of simple, well-balanced ingredients. By following the steps outlined in this article, home cooks can achieve a juicy and flavorful chicken breast that’s perfect for any meal. This recipe solves the common problem of dry, flavorless chicken breasts by emphasizing the importance of even thickness, a magic seasoning blend, and a critical resting period.
Its versatility makes it suitable for various occasions and meal plans, from weeknight dinners to special events. With the suggested variations, cooks can experiment and make the recipe their own. By incorporating this recipe into their cooking repertoire, individuals can enjoy a consistently delicious and satisfying meal. Try this recipe with confidence, and it will undoubtedly become a staple in your kitchen.
FAQ
How long can I store cooked chicken in the fridge?
Cooked chicken can be safely stored in the fridge for up to 3-4 days. Make sure to store it in an airtight container at a temperature of 40°F (4°C) or below.
Can I use chicken thighs instead of breasts in this recipe?
Yes, you can substitute chicken thighs for breasts. However, keep in mind that thighs have a higher fat content and may require a slightly longer cooking time.
What is the ideal internal temperature for cooked chicken?
The recommended internal temperature for cooked chicken is 165°F (74°C). Use a meat thermometer to ensure the chicken is cooked to a safe temperature.
Can I prepare the seasoning blend ahead of time?
Yes, you can prepare the seasoning blend in advance and store it in an airtight container at room temperature for up to 6 months.
How do I prevent overcooking the chicken?
To prevent overcooking, use a meat thermometer to check the internal temperature, and remove the chicken from the oven when it reaches 165°F (74°C). Let it rest for a few minutes before serving.
Can I use this recipe for meal prep?
Yes, this recipe is suitable for meal prep. Cook the chicken, let it cool, and store it in an airtight container in the fridge for up to 3-4 days or freeze it for later use.
What are some good side dishes to serve with this chicken?
Some popular side dish options include roasted potatoes, steamed vegetables, salad, or quinoa. You can also serve it with a side of garlic mashed potatoes or roasted sweet potatoes.