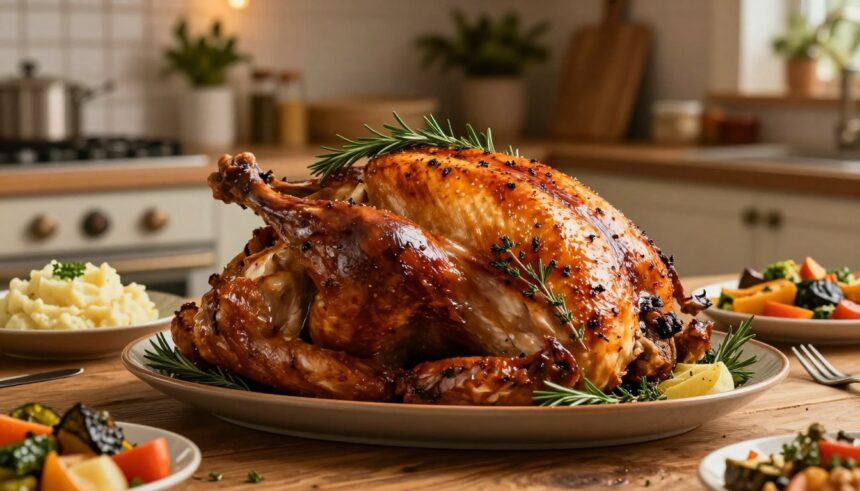
A perfectly cooked turkey is the centerpiece of many holiday meals, especially Thanksgiving. Achieving that golden-brown, crispy skin and juicy, tender meat requires a reliable recipe and some key techniques.
- Why This Recipe Creates the Perfect Roast Turkey
- Essential Equipment for Roasting a Turkey
- Preparing Your Turkey Before Roasting
- The Best Roast Turkey Flavoring Method
- Stuffing and Trussing Your Turkey
- Perfect Roasting Technique
- Turkey Cooking Times and Temperature Guide
- Resting and Carving Your Turkey
- Troubleshooting Common Turkey Problems
- Conclusion
- FAQ
- What is the ideal oven temperature for roasting a turkey?
- How long should I roast a turkey per pound?
- How do I ensure my turkey is cooked to a safe internal temperature?
- Should I baste my turkey while it’s roasting, and if so, how often?
- Can I stuff my turkey before roasting, and what are the considerations?
- How do I achieve a golden-brown skin on my roasted turkey?
- What is the purpose of letting the turkey rest after roasting?
- How do I carve a turkey effectively?
This comprehensive guide will walk you through the steps to create the best roast turkey. The secret to a succulent turkey lies in its preparation and the right cooking methods. By following this recipe, you’ll be able to achieve that perfect balance of flavors and textures.
The key to a mouth-watering roast turkey is in the details, from selecting the right equipment to mastering carving techniques. This guide covers it all, ensuring you’re well-prepared for your next holiday gathering.
Key Takeaways
- A perfectly cooked turkey is achievable with the right recipe and techniques.
- Preparation is key to a succulent turkey.
- Mastering cooking techniques ensures a deliciously golden-brown turkey.
- This guide covers all aspects, from equipment selection to carving.
- Follow these steps for a stress-free holiday meal preparation.
Why This Recipe Creates the Perfect Roast Turkey
Creating the perfect roast turkey is simpler than you think with the right recipe and techniques. The secret to a mouth-watering roast turkey lies in the combination of a special herb butter and precise cooking methods.
What Makes This Turkey Recipe Special
This turkey recipe stands out due to its use of homemade turkey butter, a mixture of butter, garlic, and herbs tucked under the skin for enhanced flavor and moisture. The result is a turkey with crispy skin and juicy meat.
- The use of herb butter under the skin adds flavor and moisture.
- Proper temperature control ensures the turkey is cooked to perfection.
- The technique of brining before roasting contributes to the overall succulence.
Key Ingredients for Success
The success of this turkey recipe hinges on a few key ingredients. High-quality butter, fresh herbs, and proper seasoning are crucial.
| Ingredient | Purpose |
|---|---|
| High-quality butter | Rich flavor and moisture |
| Fresh herbs | Aromatic flavor profile |
| Proper seasoning | Enhances overall taste |

By focusing on these elements, this recipe ensures a deliciously moist turkey with crispy skin, making it perfect for any occasion.
Essential Equipment for Roasting a Turkey
Roasting a turkey requires more than just a recipe; it demands the right tools. Having the correct equipment can make a significant difference in the outcome of your roast turkey.
Roasting Pan and Rack
A large roasting pan with a rack is crucial for roasting a turkey. The pan allows for even browning, while the rack elevates the turkey, promoting air circulation and preventing the bottom from becoming soggy. “A good roasting pan is like a good foundation for a house; it makes everything else work better,” says culinary expert, Julia Child.

Thermometer and Basting Tools
A thermometer is essential for ensuring the turkey is cooked to a safe internal temperature. Basting tools, such as a turkey baster and basting brush, help keep the turkey moist and promote even browning.
Additional Helpful Tools
Other helpful tools include a brine bag or 5-gallon bucket for brining, a disposable piping bag for easy butter application, and food-grade nitrile gloves for massaging the butter under the skin. These tools can simplify the prep process and enhance the overall result.
Preparing Your Turkey Before Roasting
Preparing your turkey is a crucial step in achieving a perfectly roasted bird. Before you start roasting, there are several important steps to follow to ensure your meal is both delicious and safe.
Thawing Your Turkey Safely
To thaw your turkey safely, it’s recommended to do so in the fridge. Plan on 24 hours in the refrigerator for every 4 to 5 pounds of turkey. For example, a 15-pound turkey will take 3 to 4 days to thaw, so you would begin thawing it on Thursday before Thanksgiving. To speed up the thawing process, you can submerge it in cold water, allowing 30 minutes of thawing per pound. Change the cold water every 30 minutes, and if your turkey is not completely covered, rotate it every 30 minutes to keep it chilled.
| Turkey Weight (pounds) | Refrigerator Thawing Time (days) | Cold Water Thawing Time (hours) |
|---|---|---|
| 4-5 | 1 | 2-2.5 |
| 8-10 | 2 | 4-5 |
| 12-15 | 3-4 | 6-7.5 |
To Brine or Not to Brine
Brining your turkey can add flavor and moisture. To brine turkey, you can use either a wet or dry brine method. Wet brining involves soaking the turkey in a saltwater solution, while dry brining involves rubbing the turkey with salt and other seasonings. Brining is most beneficial for larger turkeys and can result in a more tender and flavorful final product.
“Brining is a great way to add flavor to your turkey and keep it moist during the roasting process.”
Removing Giblets and Patting Dry
Before roasting, it’s essential to remove the giblets and neck from the turkey cavity. After removal, pat the turkey dry with paper towels, both inside and out, to help achieve crispy skin during roasting. This step is crucial for a golden-brown finish and should not be skipped.
By following these steps and taking the necessary time to prepare your turkey, you’ll be rewarded with a deliciously roasted meal that’s sure to impress.
The Best Roast Turkey Flavoring Method

Elevate your roast turkey to the next level by incorporating a delectable herb butter under and over the skin. This method not only enhances the flavor but also ensures a moist and crispy texture.
Herb Butter Ingredients
The herb butter is a mixture of 2 sticks of softened butter, 2 Tbsp olive oil, 1/2 Tbsp lemon zest, 4 Tbsp lemon juice, 3 pressed garlic cloves, 1/4 cup chopped parsley, 1/2 Tbsp salt, and 1/2 tsp pepper. These ingredients combine to create a rich and aromatic flavor profile.
How to Make Flavored Butter
To make the flavored butter, combine all the ingredients in a medium bowl or the bowl of a food processor. Mash or process until well combined, ensuring a smooth and consistent texture.
Applying Butter Under and Over the Skin
Separate the skin from the turkey breast carefully, then stuff 2/3 of the butter mixture under the skin. Massage the butter over the top to distribute evenly. Finally, apply the remaining butter on the outside of the skin for a golden and crispy finish.
Stuffing and Trussing Your Turkey
Achieving a perfectly roasted turkey requires attention to detail, particularly when it comes to stuffing and trussing the bird. While not necessary, these steps can significantly enhance the flavor and presentation of your roasted turkey.
Aromatics for the Cavity
Adding aromatics to the cavity of your turkey can greatly enhance its flavor. Recommended aromatics include a mix of herbs like thyme and rosemary, citrus such as lemon or orange, and vegetables like onion and carrot. These ingredients infuse the turkey with subtle flavors as it roasts, resulting in a more complex and appealing taste. To prepare, simply place your chosen aromatics inside the cavity before roasting.
How to Properly Truss a Turkey
Trussing your turkey helps it roast more evenly by keeping the legs and wings close to the breast. To truss, start by positioning kitchen twine around the bird, tucking it under the neck end. Bring the twine up and around the wings, pushing them towards the breast. Cross the twine at the cavity, forming an X, and then tie the ends of the drumsticks together. This technique not only promotes even cooking but also improves the turkey’s appearance.
It’s worth noting that we do not recommend stuffing your turkey. Cooking stuffing inside the turkey can lead to overcooking the bird as the stuffing takes longer to reach a safe temperature. Instead, consider cooking your stuffing in a separate dish to ensure both the turkey and stuffing are cooked to perfection.
Perfect Roasting Technique
Achieving the perfect roast turkey requires a combination of proper oven temperature and precise roasting techniques. To start, pre-heating the oven to the right temperature is crucial.
Oven Temperature and Positioning
Pre-heat the oven to 430˚F on the bake mode. It’s also important to position the oven rack correctly; place it in the lower part of your oven, ensuring your large turkey roasts in the middle and keeps the breast further from the top heating element.
The Foil Shield Method
A useful technique to protect the turkey breast and keep it juicy is the foil shield method. Fold a large square sheet of foil into a triangle, rub one side with olive oil, and shape the foil (oil-side-down) over the breast. This shields the turkey breast from getting dry.
Basting Schedule and Technique
Basting is a critical step in achieving a moist and flavorful turkey. To baste turkey effectively, use a basting schedule with specific timing intervals. This ensures maximum flavor and moisture. The technique involves carefully pouring or brushing the juices over the turkey during the roasting process.
By following these steps and understanding how roasting affects different parts of the turkey, you can achieve a perfectly cooked turkey with great texture and flavor.
Turkey Cooking Times and Temperature Guide
Cooking a turkey to perfection requires understanding the right cooking times and temperatures. The cooking time for a turkey depends on its size and the oven temperature.
Minutes Per Pound Guide
A general rule of thumb for roasting a turkey is to cook it for about 14 minutes per pound at 325°F (160°C). For example, a 15-pound turkey will take approximately 3 ½ hours to roast. It’s essential to keep in mind that this is just a guideline, and actual cooking times may vary depending on your oven and the turkey’s characteristics.
- A 4-6 pound turkey: 1 1/2 to 2 1/4 hours
- A 6-8 pound turkey: 2 1/4 to 3 1/4 hours
- An 8-12 pound turkey: 3 to 3 3/4 hours
- A 12-14 pound turkey: 3 1/2 to 4 1/4 hours
- A 14-18 pound turkey: 4 to 4 1/4 hours
How to Check for Doneness
The most accurate way to determine if your turkey is done is by using a meat thermometer. Check the internal temperature in several places, particularly in the thickest part of the thigh and the breast, avoiding any bones. The USDA recommends an internal temperature of 165°F (74°C), but it’s worth noting that the temperature will continue to rise a few degrees after the turkey is removed from the oven. Many chefs prefer to remove the turkey when it reaches an internal temperature of 160°F (71°C), allowing the residual heat to bring it to a safe temperature.
Adjusting for Different Size Turkeys
Cooking times can vary significantly based on the size of the turkey. Larger turkeys take longer to cook, while smaller ones cook more quickly. It’s also important to consider whether your turkey is stuffed or unstuffed, as this can affect cooking times. Always use a thermometer to ensure your turkey has reached a safe internal temperature, regardless of its size.
Resting and Carving Your Turkey
Once your turkey is perfectly roasted, it’s time to let it rest before carving. This crucial step allows the juices to redistribute, making the meat more tender and easier to carve.
Why Resting Is Crucial
Resting your turkey is essential for achieving a tender and juicy breast and legs. When the turkey is cooked, the juices are pushed towards the surface. Letting it rest allows these juices to redistribute throughout the meat, ensuring that every slice is moist and flavorful. The recommended rest minutes vary based on the size of the turkey, but a general rule is to let it rest for at least 30 minutes and up to an hour.
Step-by-Step Carving Instructions
To carve your turkey effectively, follow these steps:
- Start by slicing on either side of the breastbone to loosen the breast meat.
- Cut neat slices and lift them out.
- Remove the legs by cutting at the joint.
- Slice the wings and separate them from the body.
Proper carving technique ensures that your turkey is presented attractively, making it a centerpiece for your holiday serving. The key is to make clean cuts and handle the meat gently to maintain its integrity.
| Turkey Size (lbs) | Rest Time (minutes) |
|---|---|
| 4-6 | 20-30 |
| 8-12 | 30-45 |
| 14-18 | 45-60 |
By following these guidelines, you’ll be able to achieve a beautifully carved turkey that’s sure to impress your guests. Remember, the time you invest in resting and carving your turkey pays off in the quality of the final presentation.
Troubleshooting Common Turkey Problems
Even with careful planning, turkey cooking issues can arise. Knowing how to troubleshoot common problems can save your holiday meal.
Dry Turkey Solutions
A dry turkey is often the result of overcooking. To prevent this, ensure you’re cooking your turkey for the right amount of time. Using a meat thermometer can help. Additionally, seasoning your turkey as recommended can help retain moisture in the meat. “The key to a juicy turkey is not overcooking it,” says culinary experts.
Undercooked or Overcooked Issues
If your turkey is undercooked or overcooked, it can be a major issue. To avoid this, use a thermometer to check the internal temperature of the turkey. The ideal temperature is 165°F. If some parts are overcooked while others are undercooked, adjust your cooking time accordingly.
Skin Not Browning Properly
If the skin isn’t browning properly, you can increase the oven temperature to 425°F for the last 20-30 minutes of roasting. Be cautious to avoid burning. Proper browning enhances the appearance and flavor of your turkey.
Conclusion
With these expert techniques, you’ll be well on your way to creating a mouth-watering roast turkey that will be the centerpiece of your Thanksgiving dinner. To recap, the key steps include properly thawing your turkey, seasoning it with herb butter, monitoring the temperature, and allowing it to rest adequately. Don’t forget to save the turkey drippings to make a delicious turkey gravy to complement your meal.
Pair your perfectly roasted turkey with complementary side dishes and sauces for a memorable holiday feast. Leftover turkey can be stored in the refrigerator for up to four days and repurposed into tasty meals. By following these tips, you’ll be sure to impress your guests and create a lasting impression.
FAQ
What is the ideal oven temperature for roasting a turkey?
Preheat your oven to 325°F (165°C) for a traditional roasting method. This temperature allows for even cooking and helps prevent overcooking the exterior before the interior is fully cooked.
How long should I roast a turkey per pound?
A general guideline is to roast a turkey for about 20 minutes per pound. However, this time may vary depending on whether the turkey is stuffed or not, and whether it’s been brined or not.
How do I ensure my turkey is cooked to a safe internal temperature?
Use a meat thermometer to check the internal temperature of the turkey. The temperature should reach 165°F (74°C) in the thickest part of the breast and 180°F (82°C) in the thigh. Make sure to insert the thermometer into the meat without touching bone.
Should I baste my turkey while it’s roasting, and if so, how often?
Basting your turkey can help keep it moist and promote even browning. Baste the turkey every 30 minutes with pan juices or melted butter to achieve a golden-brown skin.
Can I stuff my turkey before roasting, and what are the considerations?
Yes, you can stuff your turkey, but it’s crucial to ensure the stuffing is loosely packed and reaches a safe internal temperature of 165°F (74°C). Be aware that stuffing the turkey can increase the overall cooking time.
How do I achieve a golden-brown skin on my roasted turkey?
To achieve a golden-brown skin, pat the turkey dry with paper towels before roasting, and rub it with a mixture of melted butter, salt, and pepper. You can also broil the turkey for a few minutes after roasting, watching closely to prevent burning.
What is the purpose of letting the turkey rest after roasting?
Letting the turkey rest allows the juices to redistribute, making the meat more tender and juicy. It also makes carving easier. Let the turkey rest for at least 20-30 minutes before carving.
How do I carve a turkey effectively?
To carve a turkey effectively, start by removing the legs and thighs, then slice the breast meat against the grain. Use a sharp knife and carve in a smooth, even motion to avoid tearing the meat.